Bare-Root Tree Planting to Celebrate Arbor Day
Step-by-step instructions describing how to plant a bare-root tree.
This year, to celebrate Arbor Day, we’re dispersing 50 sugar maple seedlings to our community for free. We purchased the trees from the Arbor Day Foundation, a non-profit that works to create a greener world through tree planting and education.
Our Project Managers will have the seedlings available as they travel their routes across King County. Distribution starts April 9 and will go until our supply runs out.
If you’d like a sugar maple for you or someone you know, email us at info@seattletreecare.org. We'll arrange a time for you to come pick up your tree(s).
Did you receive a tree from us and need to know what to do next? See below for step-by-step instructions on how to prepare and plant your maple tree.
We’d love to see how this tree benefits your outdoor space. Tag us on social media and use the hashtag #LoveYourTrees to show us once it’s planted and as it grows!
Pre-planting Guide for your bare-root tree
- Your first thought after receiving your tree may be, “Oh no! Is my tree dead?” Even though your tree looks skimpy and bare right now, it should be alive, just sleeping. To make sure, do a tiny scratch test on the bark. If you scratch and see green, your tree is alive.
- “Right tree, right place” is an important adage when planning where to plant your tree. This is a sugar maple, which can mature as large as 60-70’ tall and 40-50’ wide. Try to find a spot on your property where the tree can enjoy full sun or partial shade.
- Always call 811 before you dig! 811 will check under where you’re planning to plant to make sure it’s clear of utility lines. We call 811 before every stump grind to make sure it’s safe.
Planting Guide for your bare-root tree
- Free your tree from its compostable planter.
- Carefully shake the dirt off the tree’s roots and detangle. Be careful not to let the roots dry out before planting.
- Dig a wide hole. Now make it wider. Yes, even wider. Even though your tree is teeny-tiny right now, its roots will grow outward. To avoid root crowding, your tree needs a hole 3’ in diameter to snuggle into. Keep the soil you dug out, you’ll use it later.
-
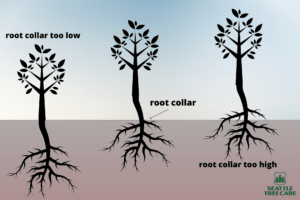
Holding the top of the trunk in your hand, find the spot where the first roots show, known as the root collar. This collar should be only just covered by the soil. Place the tree in the hole you’ve dug. Make sure the tree is not set deeper than the soil surrounding it.
Plant your new tree's root collar just below the tree surface
- Replace the soil you dug out. No need to add fertilizer, sand, or peat moss. It’s better to go au naturel. The soil should be firm but not rigidly packed.
- Build a water basin around your tree & give it plenty of water.
- Once the water has soaked in, add a protective mulch barrier around your tree. We are providing a small bag of STC arborist mulch with each tree, but you’ll likely need a bit more. Leave your tree some breathing room, though. Don’t let too much mulch cover the trunk.
- If weather is uncharacteristically dry during the tree’s first year, give it a generous amount of water every 7-10 days. You’re looking for moist not soaked soil. See our blog post about more tips for watering your newly planted tree.
- Congratulations! Your tree is planted. Now is the hardest part: Time to be patient!
Enjoy your tree! And please plant responsibly.
SEE MORE ARTICLES FROM OUR b(LOG)
We've got you covered with tips, resources, updates, how-to's, and other helpful information about trees and landscapes in Seattle, Puget Sound, and King County, WA. Join the thousands of smart local residents who get the monthly newsletter from Seattle Tree Care for helpful information you won't want to miss!
There's no spam - we promise! We are committed to keeping your e-mail address confidential. We do not sell, rent, or lease our contact data or lists to third parties.


